
Uncover #01: Love Me Jeje by Tems
A race against time

I enjoyed making the cover in my previous post.

And like I mentioned, I’d like to keep doing it because it’s fun and I’m learning a lot. So, to make sure I keep at it, I’ll make this into a series, the “Uncover” series, where I go through the process of making a cover.
The focus will be on what I did, the tools I used, and what I learned. It’s more about progress and less about perfection. It may not be an in-depth analysis of all the technical bits, but it’ll be enough to understand what’s happening and allow you to delve deeper into parts you find interesting.
In addition, I’ll omit the narrative or creative writing that I included in the previous cover article. Don’t worry, I’ll still add a joke here and there, but this will help keep things concise. I’m not sure if I’ll still do voiceovers for this series, but I’ll play this by ear.
Alright, with that out of the way, the song I picked this time, Love Me Jeje by Tems has been coming up on my Spotify and YouTube music rotation and I’ve been vibing to it. So I decided I’d do a cover.
The Instrumentals
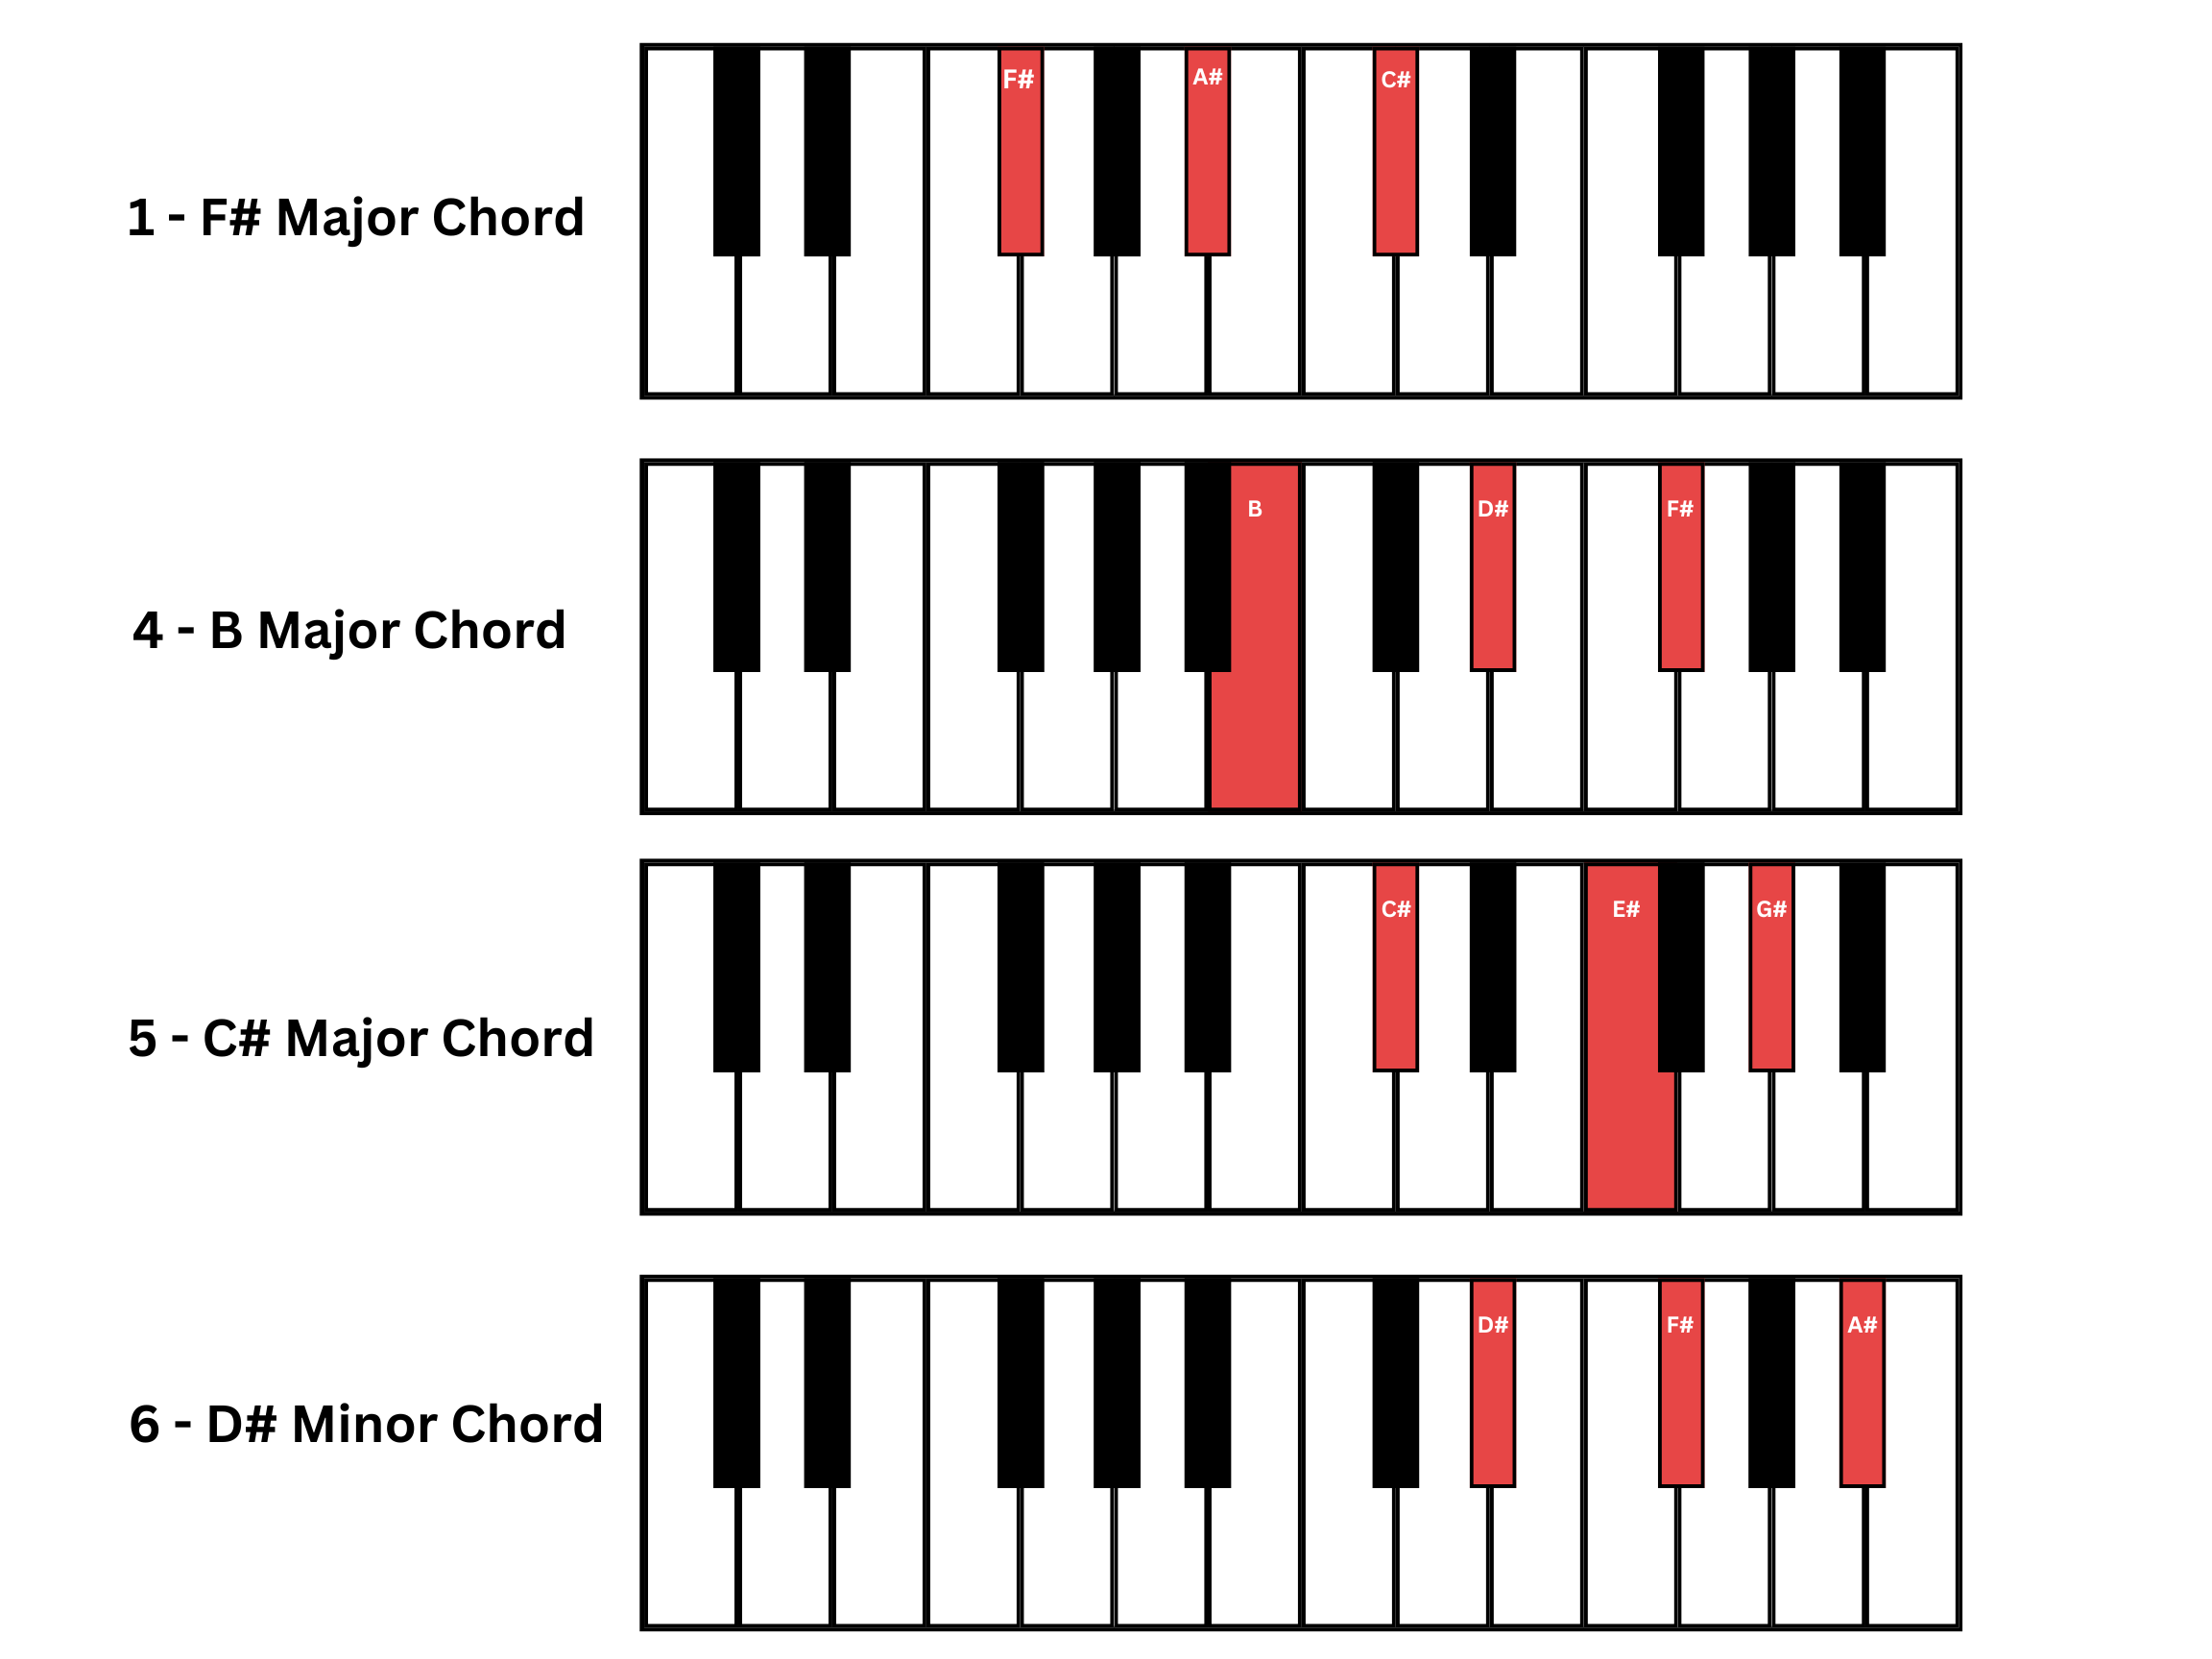
For this song, the key signature is F# (sharp) major, it has a Beats Per Minute (BPM) of 104, and it follows the chord progression of 1, 4, 5, and 6 when using the number system.
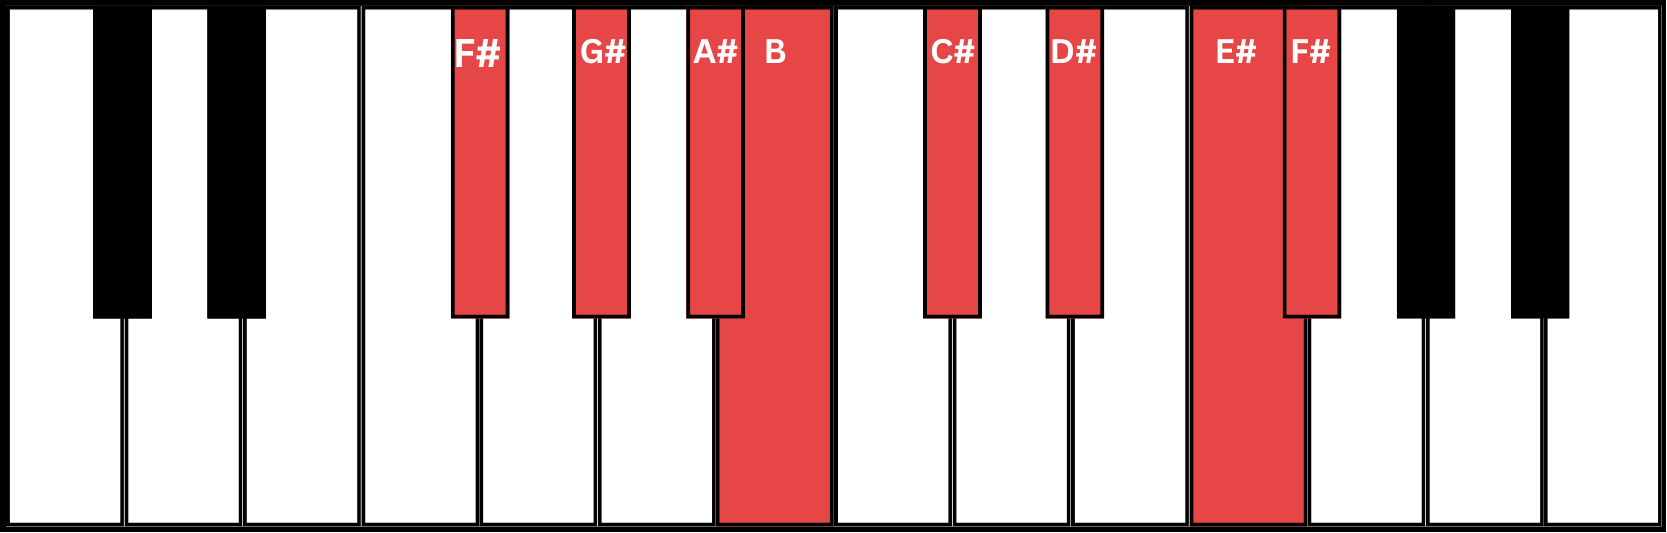
You know the drill by now. The keys in F# major scale are F#, G#, A#, B, C#, D#, and F. So 1 would be F# (F# major chord), 4 would be B (B major chord), 5 would be C# (C# major chord), and 6 would be the D# (D# minor chord).
It took a bit to figure out the chord progression. I tried to do it by ear, and initially thought it was 1, 5, 6, 4. But it didn’t sound right, mostly because the last chord is going up the scale(6) instead of coming down the scale(4). I ended up Googling the chords.
Once I got the chords, I had to get the timing and feel for the song right. After recording the keys to Logic Pro, I did some editing to make it match the BPM more accurately. It did, but was still a little off.
So I went on YouTube, found the original song with the vocals stripped out, imported it into Logic Pro and used it as a reference track. This allowed me to listen to both the original instruments and my keys simultaneously. This helped improve the feel of the song with some manual edits.
To tighten things up further, Logic Pro has a feature that allows you to set a track as a groove, and then have other tracks follow it. That simply means you can have other tracks match the BPM of your song by following the feel of any track you set as groove, through a process known as Quantization. So I set the reference track as the groove and had the keys follow it. This made the timing of the keys sound more in tune with the original. And like before, I looped the 4 chords since it’s the same chords throughout the whole song.
Once I had the chord progression done, I added extra layers of piano melody. One of the beautiful things I’ve learned in music theory is that as long as you’re playing on the right music scale of a song, it will always sound right (provided you match the rhythm). So while listening to the chord progression play, I came up with two different melodies that I felt sounded good, and so I added them to the mix.
As you can probably tell, this took some time, but in the end I was happy with the results. This, I think, is my favourite part of the entire process. When you come up with something you think is cool, it’s exciting.
The Vocals
This took the most time to get done. Much like last time, it took several takes to get the right vocals. A few reasons for this, first, I was learning the lyrics while recording, and at 104 BPM this song is faster than I’m comfortable with at the moment. So when I recorded, I overcompensated by singing some sections way too fast, and some words were being slurred.
After multiple takes, and a complete song, I had a version I thought was okay. It still had a few sections that seemed a bit too fast. But I was going to deal with that in the mixing and arrangement section.
Once the lead vocals were done, I got to my favourite part, the ad-libs! I did a few takes, experimented with different pitches and tones, and picked the ones I liked.
For the finishing touch, I doubled some parts of the lead vocal simply because I loved the way it sounded.
The Mixing and Arrangement
When I started listening to the song to see parts that were off and needed fixing, I found the second verse of the song felt more rushed than the first. So it ended up not making the final mix. I suppose part of being a good producer is also knowing what to leave out. The entrance to what seems like a second verse abruptly shortens after the first chorus, and the hook comes in next. I could’ve left out that part and just gone straight to the hook, but I liked the way it sounded, so it stayed.
I then adjusted the gain on parts of the vocals that were too high or too low. I used the Fade tool to ease into and out of different audio sections, so a new sound or section doesn’t seem too sudden.
For some more advanced audio editing, Logic Pro has a cool feature, Pitch Flex which allows you to adjust the gain, timing or pitch of audio recordings. But like with most things, it’s not a silver bullet. If the performance is terrible, there’s not much Logic Pro can do for you. This is one reason I got rid of the second verse I did, it sounded too rushed, and some parts didn’t feel right, I tried to use Pitch Flex to fix it, but in the end, no matter how much makeup you apply to a frog, in the end, it’s still a frog.
Finally, as little as I know about mixing, I know even less about mastering a track. Luckily, I just found out that Logic Pro has a mastering assistant. This helps with applying corrective EQ, adjusting loudness, and overall stereo spread, as shown in their docs. Apart from adjusting for loudness, I don’t fully understand what the rest means, but this makes the exported audio sound good on different devices.
As I make my way through learning about all things related to audio production, I imagine I’ll eventually understand some of these concepts better, enough to make custom adjustments. Like before, here’s the link to the stems if you’d like to experiment with them.
Thoughts
I think overall, the production of this is better than the last one because I’ve learned a lot since then. And despite the vocals not being exactly what I want, it comes through more confident. Possibly because I’m getting more comfortable with a mic, as well as doing retakes when I have a better grasp of the lyrics. But there’s still a lot I could improve on.
I’ve been trying to make full songs each time, which I now see is not a great idea for now. I spend too much time trying to make a full song when I could make smaller sections, perhaps just one verse. This will give me enough time to record, walk away, come back to it, give it multiple listens, and do re-recordings for parts I don’t like. I believe this would get me closer to perfection a lot faster. Eventually, when I get the hang of things, I’ll make longer or more complete songs.
Also, my ears are suffering from listening to these recordings repeatedly. I wonder what musicians or producers do to protect their ears or do they just accept that at some point they’ll be partially deaf? I kinda need my ears, so I’ll have to figure something out.
Finally, since I’m making this up as I go, let me know if there’s any section you find more useful or less so, or perhaps information you’d be curious to know more about.
The Song
Here’s the song, not uploading it to SoundCloud this time. Something about that feels like the song needs to be perfect. Since I’m more focused on learning at the moment, I’ll have the audio live here instead and perhaps with time I’ll change that.
Hope your listening experience is as good or better than last time. However you feel about it, I would love to hear about it in the comments. Until next time.
I really enjoyed this - reading about the process really helped me appreciate the layers of the song. Now to find who will love me jeje 🥹